A blog about Grip Strength, Dinosaur Training, Feats of Strength, Stonelifting, Kettlebell Training, Strength and Conditioning for Martial Arts, and the Paleo Diet.
Showing posts with label home-made. Show all posts

Wednesday, April 24, 2013

Home-made Thumb Strength Telegraph Key

Here's ainspiration to build your own telegraph key-style thumb strength machine and save a lot of money:


Make do with whatever scrap metal (and/or wood) you have lying around...


You will probably have to do a bit of welding, but only a minimum was necessary for my model. Maybe you will find a way without any welding at all?


The rest was screws and bolts.


And a bit of spray paint to make it look better and more resistant against rust.


There you go! Lots of money saved.

Best,
Robert

Friday, August 17, 2012

(English) Home-made Inch / Circus dumbbells


Here are three of my training tools for grip strength and overhead press training:


I thought they might be an inspiration for anyone who wants to train towards feats like lifting the Inch dumbbell or push-pressing a Circus Dumbbell as the modern Strongmen do, but wants to save money on the expensive replicas and Circus Dumbbells in stores.

They all have the infamous 2.38 inch (6cm) diameter thick handle.

The one on the left I actually made myself out of an old steel pipe and spherical molds for the concrete. It was inspired by Tommy Heslep's "Stonebell" which can be seen here:


Hint: I'm currently working on a grip strength e-book with Tommy Heslep in which we will tell you how to make one of these yourself! 

Mine weighs about 40kg (88lbs) – hence much lighter than Tommy’s - and is handy for warm-up and overhead presses for reps. It's like the Circus Dumbbell equivalent of the "Trainer" of the Captains of Crush Grippers.

The one in the middle on the photo above is the one I use most often these days.

This one, just like the one on the right, was made by my reliable metalworker who welded it together within a few days for about half the money an Inch replica or Circus Dumbbell with the same weight would cost in stores. Maybe you can find somebody who has the material and tools to do this for you as conveniently.

It weighs about 60kg (132lbs). It is good for holds and dumbbell rows for open hand grip strength training and one-hand clean and push press attempts, although I have to admit that at the moment I can only do a continental one-hand clean and press with it, resting it on my hip for a short moment.

I’m working on cleaning it properly at the moment.

The one on the right is the big baby.

It weighs 70kg (155lbs) and thus comes close to the Inch dumbbell. I’m still having problems deadlifting it properly with one hand, but this is the goal. Well, actually the goal is to one-hand clean and push press it, whereof the push press is the easiest part. When I start with it resting on my hip, I can also do the second phase of a continental one-hand clean.

***

I believe that these three dumbbells, although relatively cheaply produced, resemble the dynamics of the Inch-type dumbbells quite closely, closer at least that any plate-loaded or shot-filled Circus Dumbbells. This makes them appropriate not only for Strongman Circus Dumbbell training, but also for feats of grip strength.

Of course, they are proportionately longer than an Inch-type dumbbell, which changes the dynamics when trying to clean them a little bit.

By the way, anyone who regrets that the weight of such a dumbbell is fixed and cannot be progressively increased must know that at times I “load” them with two 1,25kg (2.75lbs) or 2,5kg (5.5lbs) plates which I fix to the outer ends with bicycle tubes. This works quite well and I can thus increase the weight of any dumbbells by up to 5kg (11lbs). Note that this is possible because of the cylindrical shape of the weights – it wouldn’t be that easy if they were spherical in shape.

Best,
Robert


Monday, June 4, 2012

(English) Casting your own Atlas Stone: 10 Don'ts

As my most recent project was a home-made Atlas Stone for Strongman training, using the plaster-of-paris-beachball method, I was looking forward to share my experiences with you afterwards and provide a little guide for you to follow.

However, in retrospect I thought the internet doesn't need another how-to on making Atlas Stones, especially from someone who did so with a less than average result:


Ain't she a beauty?

No, she isn't.

So instead of telling you how to make your own Atlas stone, I decided to tell you how NOT to make your own Atlas stone. Read a proper guide on casting your own stone first (here's one I recommend: Everything you need to know about making Atlas Stones) and then read on.

I made most of the following common mistakes. Be wiser:

1) Choosing the wrong location: Preferably, work in your garage or basement. You will need a location where plaster and cement splashes aren't a problem. You will need water and power supply. And you want to avoid rain, frost, and direct sunlight. I started out in a location without power supply, until I realized I would need power to operate the concrete vibrator.

Yes, you can still move to a different location with the finished plaster mould:


But I wouldn't recommend it. Transporting the mould in my car as seen in the picture above might have been the reason why it broke later on.

2) Not having the proper tools at hand: I believe anyone can build almost anything if he has the proper tools at hand and knows how to use them. Make sure you have all the tools you need ready before you begin to work. Leave as little to chance as possible, and avoid improvisation. Especially when working with material where time is a factor. You don't want to go on a search for a tool to vibrate the concrete while it gradually dries. Do you have buckets at hand to mix the plaster? Do you have a scale to weigh the cement? Do you have an air pump for the beach ball? Be prepared for any scenario.

3) Choosing the wrong beach ball: The best ball I could find was the kind of toy for kids to sit on and jump around, with two handles to hold on to. It looks a bit like an udder upside down. It had the right size and was sturdy, but the handles were farther apart than I had thought in the beginning. It forced me to leave a larger hole to pour the cement in than I wanted:


As a consequence, the stone lost some more of its spheric shape.

Try to find a ball the right size, as sturdy as possible, and - without handles.

4) Being sloppy when mixing the plaster: Mixing the plaster can be trickier than you think. Use too much water, and it won't hold. Use too little water, and it will harden before you can process it. I had no tools at hand to determine the proper mixture, so I went by feeling - and ended up with a bad mould and a lot of wasted plaster.

5) Being sloppy and impatient when making the plaster mould: When I started on the mould I thought this would be done within an hour. How wrong I was. It takes much, much longer. When I found this out, I grew impatient and simply wanted to finish this thing. The consequences were:

  • A no-good base for the ball. This turned out to be the biggest blemish of the stone later. The bottom of it still looks worse than the top, although you would expect the opposite because the mould as a hole on top. Take your time to make a proper base for the ball. It's a way to start out well.
  • Holes all over. When I deflated the ball and took it out to have a look at the mould from the inside, I was quite surprised how many holes and irregularities were left. I had to mix almost another bucket of plaster to correct at least the worst of those blemishes. Try to do it right from the beginning (although you will probably not get around fixing some holes either way).
  • A broken mould. Just as I wanted to fill in the last bit of cement to finish the cast, my mould broke and displayed a large crack across the whole of it. I was lucky it didn't fall apart altogether (read why below). I don't know whether this happened because it was too thin, or because it was already blemished from the ride in my car. In any case, make sure your mould is thick enough.


6) Not using gloves: In case you didn't know, cement is acidic. I didn't know the first time I worked with the material, and my hands all dried up and were rough for a couple of days. I know, I know... who cares? But any professional who regularly works with cement wears gloves. They know why.

7) Not taking precautions for the case the mould breaks: In one way I was lucky when the mould broke, because the last minute before I began pouring the cement in, my instincts told me it would be a good idea to build this kind of safety net around it with a few wooden boards:


I had planned to fill all of it with sand, but had only little sand at hand. Only about a third of it was filled with sand, and I also threw a few pebbles in between the mould and the wooden boards.

I think it saved my stone. If you have just the slightest worries that your mould might break for whatever reason, better take this precaution than watch 200+ lbs of cement pour out of the mould you put so much work in.

8) Waiting too long to take the stone out of the mould: If you wait much longer than 24 hours before you take the dried stone out of the mould, you will have a hard time correcting any flaws on its surface. And yes, your stone will have flaws.

9) Not asking an expert: If you don't have much experience with cement or plaster, someone who is familiar with the materials can tell you things you would never have thought of, in a few words. For example that you should put a moist cloth over the opening of the mould if it is exposed to direct sunlight, or that it is ESSENTIAL to vibrate the concrete to get rid of excess air and water.

I know you want to do it on your own, but be a man and ask for advice.

10) Trying to cast your own Atlas stone using the plaster-of-paris-beach-ball method. You will save A LOT of time and headaches by using professional moulds if you desperately want to cast your own stone, and by simply buying a finished Atlas stone if you just want to own the thing.

Best,
Robert

Sunday, May 6, 2012

(English) How to find a tire for Strongman training

A short field report and some advice on how to get hold of a tire for Strongman training (tire flip). Credit goes to the incredible Leo Moser  (www.ll-motion.at), who gave me some advice to start out on my search for a tire.

Here is the tire I found this way. Ain't she a beauty?


It weighs 770 lbs.

Finding the tire: I went to my local tire dealer and explained the issue to the guy in the office: I'm looking for an old tractor tire or something similar for Strongman training. Somewhere between 660 and 880 lbs. Luckily, almost everyone is familiar with the Strongman sport and especially craftsmen are fascinated by it. He was willing to help me right away. After a few phone calls it turned out that their company had no appropiate tire lying around. To my surprise the man began calling all rival companies in town. The last one he called told him, yes, they have a damaged wheel of a digger which can be disposed of. I can come and pick it up.

So I had found my tire the first time I tried. My conclusion is that it is not much of a problem to find a fitting tire in a larger town with a couple of tire dealers, if you allow yourself a couple of weeks' time in the worst case.


Paying for the tire: I already knew from Leo Moser and some other people that tire dealers usually simply dispose of damaged tire which cannot be reconditioned (for example, if there is a hole somewhere in the rim). They probably even have to pay a fee to get rid of it, which they save if you take it. So: never pay for a tire. If someone offers you a tire and wants you to pay for it, because he could still make use of it otherwise, be patient and wait for a better opportunity.

However: a few workers at the company where I picked up the tire really toiled to help me with loading the tire. Therefore I gave them 10 EUR to buy a cup of coffee. As the workers themselves won't have any personal benefit from helping you, I think this is the least you can do. 10 EUR as the only expenses for such a nice piece of equipment is probably even rather stingy.

Hauling the tire: A friend of mine lent me a trailer to transport the tire with my Jeep. However, the tailer wasn't wide enough, so I had to load it slantwise, leaning on one of the side panels. I had fixed it properly with ratchet straps, but I was still very careful when driving through town. If your trailer, loaded with a 770 lbs tire, tilts in a turn, it won't be a lot of fun. If possible borrow a trailer where you can be sure the tire can lie flat. You will feel a whole lot better. An alternative is a delivery truck, but even there I would make sure it is wide enough for the tire to lie relatively flat, or can be tied down securely. If it see-saws while driving, or starts to roll to and fro, you won't have fun either.

The slantwise loaded tire had one advantage, though: I could unload it relatively easily on my own. As it was already almost upright, I only had to erect it completely and roll it off the trailer. Do this only if there is ample saftey space. Who knows where the tire will roll and what damage it will cause there.
When loading the tire onto your vehicle you will be dependent on the know-how of the working at the tire dealer. Generally, however, it is not a bad idea to take a strong buddy with you for the whole process. A tire you can flip with much effort as a trained man, can usually be flipped by two strong, untrained men as well. Having a friend with you will save you a lot of work and risk when unloading the tire. Should the tire land unluckily and cannot be left lying where it is, you will have to perform a feat of strength on the spot, with a tire you probably never had a chance to test. With the help of a friend it will only be half as difficult lift it upright and roll it away, if necessary.

Determining the weight: If you tell your tire dealer you need a tire wheighing exactly 689.8 lbs, not more and not less, you won't have any luck. Because most of the time the tire experts won't know themselves how heavy a tire is exactly (why should they, it is of no use for them to know). The following helped me to pick a tire: I asked one of the workers, now, how heavy is  that tire? Of course he couldn't tell me exactly, but he remarked that neither he nor any of his colleagues is able to 'flip' it on their own - two of them together can do it, though. This sounded like the proper mix of challenge with possibility to me.

Still, I wanted to know the exact weight of the tire (at least to let you guys know). So before I picked up the tire I drove to the local junk yard, where I know they have a truck scale. I drove onto it with car and empty trailer and asked for the weight. I noted it down. Then I went to pick up the tire. Once I had it on the trailer, I drove to the junk yard again and asked for the weight once more. It was almost exactly 770 lbs more.

By the way, if you behave naturally all the time and act as if what you are doing is self-evident, you will not be faced with too many questions.

Storing the tire: Remember: it is not a rpoblem for the tire dealer to give away a damaged tire for free, because they will probably save a disposal fee. This means: if you want to get rid of your tire, it is likely that you have to pay! Except if you find someone in your vicinity who trains as fanatically as you, has the space, and takes it over (rather unlikely). So get hold of a tire only if you have the space to store it indefinitely! Getting rid of it quickly can become a real problem otherwise.

Apart from that, storage isn't complicated. Neither snow, rain, frost, nor sun can damage your tire to such a degree that you won't be able to train with it.

As a rule, tires are preserved for a longer time that humanity could wish for.

Have fun flipping tires.

Best,
Robert

Sunday, February 5, 2012

(English) Self-made Strongman log: first test

My younger brother couldn't resist testing our new homemade Strongman log (see last post) right away. I'd say it works quit well:


By the way, my younger brother doesn't work out at all. He's just a hard working craftsman. Not a bad feat considering this, and that the empty log is about his bodyweight (about 144 lbs - the log lost some weight because of the square holes). He did it the first time he tried.

(English) How to make your own Strongman log

This lovely but cold Sunday morning I put the finishing touches on my first homemade Strongman log. There it is:


Ain't she a beauty?

If you want to make your own, here is what I did:

I phoned a couple of lumber mills to check which one sells log without bark. I found one, went there and purchased a 6 1/2 feet long, 1 foot diameter spruce log (these where the dimensions I found on the Internet for an empty Strongman log of about 155 lbs). 25 EUR.

I have to admit, it seemed awfully heavy. At home I weighed it: about 300 lbs. What was wrong?

Of course, the wood was rather fresh and full of water. To let it dry would take about two years. So I searched for another lumber mill with a drying room and found one. Fortunately, they let me put the log into their chamber for a week. This cost me another 20 EUR I didn't want to spend, but next time I will be wiser.

When I picked it up, it had almost exactly 155 lbs. So the 20 EUR eventually saved me a lot of time.

Then I began by cutting two square holes into the log with a chainsaw. About 8 by 7 inch, with the centers of the holes (where the handles would be) about 2 feet apart.

Be careful when working with a chainsaw, by the way, they can be dangerous.

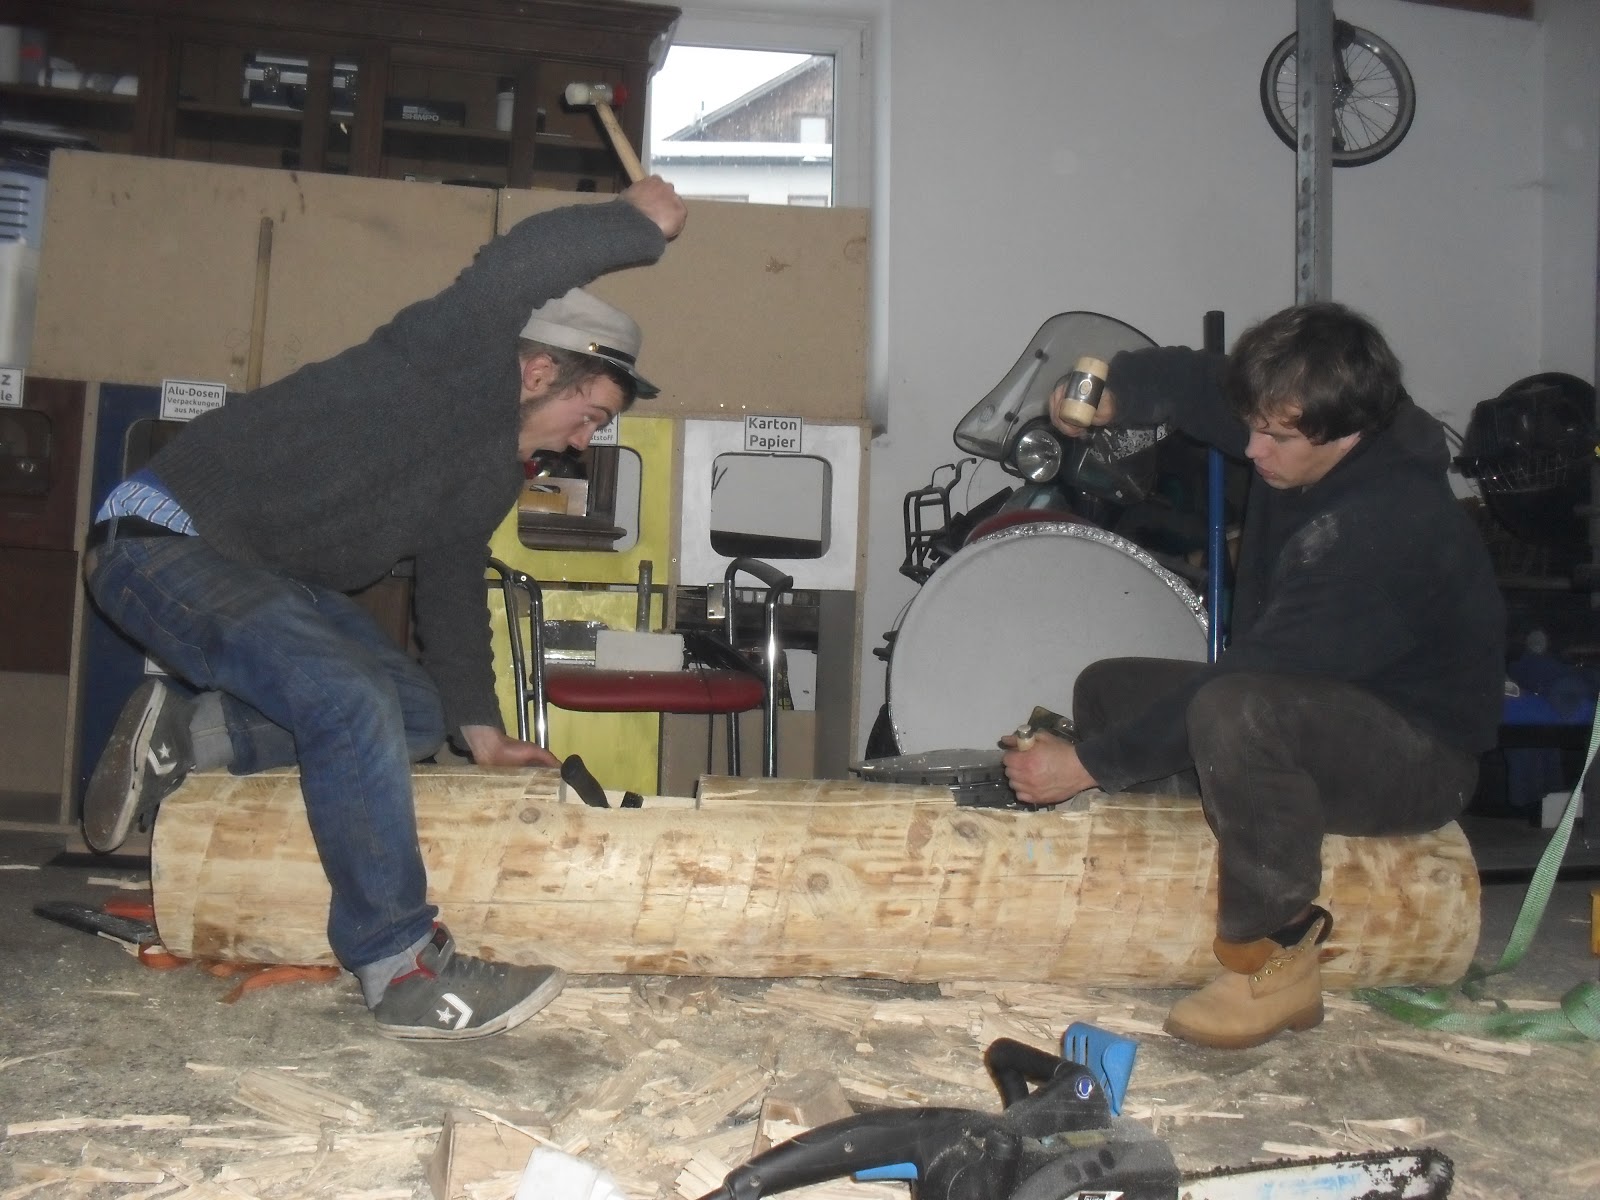
Then came the hardest part: taking the wood out of the holes. At first I used a pick hammer for the rough work, then a chisel.


This part of the job took most of the time. Luckily a friend and my younger borther (here in the picture), lent a helping hand.


The rest was easy. I drilled round holes through the center of the log where the square holes are, and two holes into the ends of log. As I wanted to use an old iron pipe for the handles and loading bars with a diameter of 1.06 inches, I used a drill about 1 milimeter less in diameter.


Then I hammered the end pipes into the holes at the ends of the log and decided they would hold.

With the handles I was more cautious and put some extra strong glue into the drill holes before hammering the pipes through to make sure they would resist the strain put on them during a heavy clean.


Then I hammered the handle pipes through.


This is how you put additional weight on it:


There you go. Looking forward to my first workout with it.

Good luck with your own!

Best,
Robert